Coloured RGBW star lights can transform the atmosphere of a room, a hallway or an alfresco ceiling and let you tailor the lighting to your own taste. Connecting RGBW star lights is more involved than wiring single-colour star lights, because each light carries five conductors and every part of the system has to match. This guide covers the specifications and connection guidelines for star light installation, including the transformer sizes, the controller, the wiring colours and the control options.
Please read the specifications below before ordering, so you receive the correct components for the number of lights you plan to install. You can also download the Star Lights connection diagram (PDF) to keep on site.
How an RGBW star light system is put together
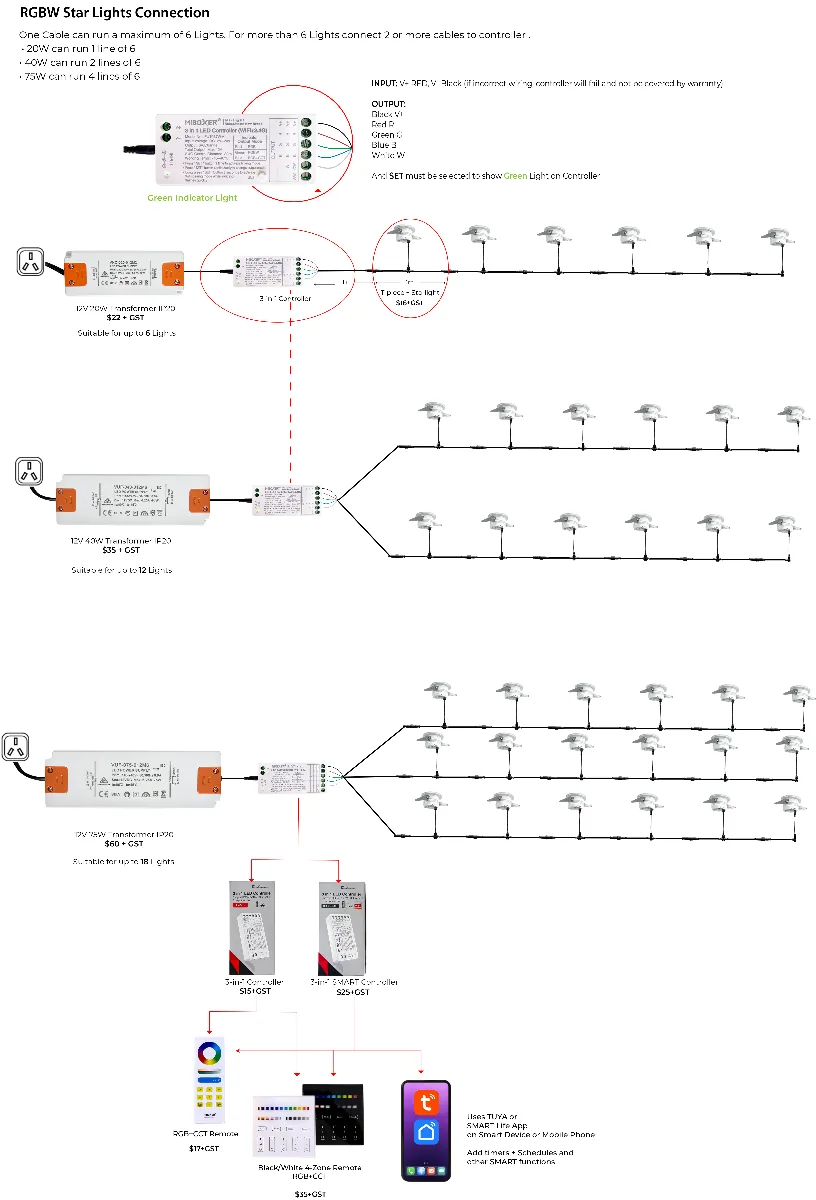
An RGBW star light installation has four parts, connected in this order:
- A 12V LED transformer (driver) plugged into a standard power point.
- A 3-in-1 LED controller that takes the 12V supply and drives the red, green, blue and white channels.
- One or more cable lines of star lights, each light spaced 1m apart along the cable.
- A remote, wall remote or the Tuya or Smart Life app to choose colours, brightness and scenes.
Each star light is a single piece with its own lead and sells for $16 + GST. Because the system runs on 12V DC on the light side, it is low voltage and safe to handle once the transformer is unplugged. The mains-side power point and any fixed wiring must still be installed by a licensed electrician.
Choose the right 12V transformer
One cable line can run a maximum of 6 star lights. For more than 6 lights, connect 2 or more cable lines to the controller and size the transformer to suit:
- 12V 20W transformer, IP20, $22 + GST: runs 1 line of 6, suitable for up to 6 lights.
- 12V 40W transformer, IP20, $35 + GST: runs 2 lines of 6, suitable for up to 12 lights.
- 12V 75W transformer, IP20, $60 + GST: runs 4 lines of 6, suitable for up to 18 lights on three lines, with capacity for a fourth line.
IP20 means the transformer is rated for dry, indoor locations such as a ceiling space, not for exposed outdoor mounting. Keep it accessible and ventilated. Do not exceed the line and light counts above, as an overloaded transformer runs hot and shortens the life of the whole system.
Wiring the 3-in-1 controller
The controller is a MiBoxer 3-in-1 LED controller with WiFi 2.4G, and it sits between the transformer and the star lights. The wiring colours matter, so check them twice before powering up.
Input from the transformer
- V+ to the red wire.
- V- to the black wire.
If the input is wired incorrectly the controller will fail, and this failure is not covered by warranty.
Output to the star lights
- Black: V+ (common positive)
- Red: R (red channel)
- Green: G (green channel)
- Blue: B (blue channel)
- White: W (white channel)
Once wired, the SET button must be selected so that the green indicator light shows on the controller. The green light confirms the controller is in the correct output mode for RGBW star lights.
Step-by-step connection
- Plan the layout and count the lights. Allow 1m of cable between lights and a maximum of 6 lights per line.
- Select the transformer: 20W for one line, 40W for two lines, 75W for up to four lines.
- Have your electrician install a power point in the ceiling space or cupboard where the transformer will live.
- Connect the transformer output to the controller input, red to V+ and black to V-.
- Connect each star light line to the controller output terminals, matching black, red, green, blue and white.
- Where you have two or more lines, join each line's five wires to the same five output terminals so every line is driven in parallel.
- Press SET until the green indicator light shows on the controller.
- Plug in the transformer and test every colour channel before closing the ceiling.
Controller and remote options
Two controller versions are available. The standard 3-in-1 controller is $15 + GST and works with the handheld and wall remotes. The 3-in-1 SMART controller is $25 + GST and adds app control through Tuya or Smart Life on a smart device or mobile phone, so you can add timers, schedules and other smart functions such as voice control.
- RGB+CCT handheld remote, $17 + GST: colour wheel, white tone adjustment and brightness.
- Black or white 4-zone wall remote, RGB+CCT, $35 + GST: controls up to four separate groups of star lights from one panel.
- Tuya or Smart Life app: requires the SMART controller and a 2.4G WiFi network.
All prices above are as shown on the connection diagram and may change, so confirm current pricing when you order.
Getting help in Perth
If you are unsure how many lights, lines or transformers your ceiling needs, bring your plan to Greenhse Technologies. The Perth showroom at 5/1 Locke Lane, Ellenbrook WA 6069 has star lights on display, and the team can put together the transformer, controller and remote package to suit. Call (08) 9297 2969 for advice before you order.
Shop the range